Associating an NAA ID with Physical Drive Bay Location on HPE Servers Running ESXi 6.7

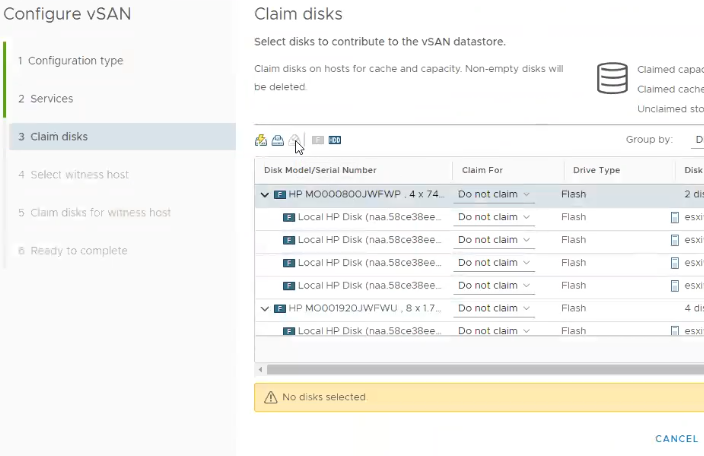
While deploying vSAN clusters on HPE servers, I came across a problem. The vSAN wizard did not display the physical bay number of the drive, so I had to figure out another way to associate the displayed NAA ID of the drive with the physical drive location. 

Disks as they appear in the vSAN configuration wizard

In my situation, I want drives in bay 1, 3, and 5 to be in disk group 1, drives in bays 2, 4, and 6 to be in disk group 2. To visualize this end goal, check out the image below.

Desired disk group layout

In order for this solution to work, it is required to have installed ESXi with the HPE ESXi image. The HPE custom image includes the Smart Storage Administrator CLI (SSACLI) utility, which is the secret sauce for identifying drive location programmatically in HPE servers. For ESXi 6.5 and forward, the following command will return physical drive information:

/opt/smartstorageadmin/ssacli/bin/ssacli ctrl slot=0 pd all show detail

The output will look something like this, with an entry for each drive.

physicaldrive 1I:1:4
Port: 1I
Box: 1
Bay: 4
Status: OK
Drive Type: Unassigned Drive
Interface Type: Solid State SAS
Size: 1.9 TB
Drive exposed to OS: True
Logical/Physical Block Size: 512/4096
Firmware Revision: HPD2
Serial Number: –
WWID: 58CE38EE2057D3C6
Model: HP MO001920JWFWU
Current Temperature (C): 29
Maximum Temperature (C): 30
Usage remaining: 100.00%
Power On Hours: 592
SSD Smart Trip Wearout: False
PHY Count: 2
PHY Transfer Rate: 12.0Gbps, Unknown
Drive Authentication Status: OK
Carrier Application Version: 11
Carrier Bootloader Version: 6
Sanitize Erase Supported: True
Sanitize Estimated Max Erase Time: 1 minute(s), 10 second(s)
Unrestricted Sanitize Supported: True
Shingled Magnetic Recording Support: None
Drive Unique ID: 58CE38EE2057D3C56193000858CE38EE

Pay attention to the highlighted WWID value. I have intentionally left off the last character. The highlighted string is the same as the NAA ID that appears in the vSphere wizard, minus the last character. We now know that the drive in this example belongs in bay 4, and is a capacity drive in disk group 2. Similar to this example, you can now use the output for the other drives to identify their physical location of each NAA value, and assign it to the proper disk group for your design.

Alternatively, you can use the serial number (removed from this example) to match up with what you can find in the iLO interface. 

However, logging into every host and running the command can be a bit tedious. Instead, I threw together a quick powershell script that leverages Plink to pull that information from specified hosts. You could easily modify the script to process multiple hosts at once or process the output however you like.
 

########## Define the below values ##########
$vmhost = "esx1"
$user = "root"
$Passwd = "password"
$PathToPlink = "C:\plink.exe"
######## DO NOT EDIT BELOW THIS LINE ########

$cmd = "/opt/smartstorageadmin/ssacli/bin/ssacli ctrl slot=0 pd all show detail"

$plink = "echo y | " + $PathToPlink + " " + "-ssh" + " " + "$user" + "@" + $vmhost + " " + "-pw" + " " + $Passwd + " " + '"' + $cmd + '"'

Connect-VIServer $vmhost -User $user -Password $Passwd
#Starts the ssh service on the host if it is not running
$sshstatus = Get-VMHostService  -VMHost $vmhost| Where-Object {$psitem.key -eq "tsm-ssh"}
if ($sshstatus.Running -eq $False) {
    Get-VMHostService | Where-Object {$psitem.key -eq "tsm-ssh"} | Start-VMHostService
    }
Write-Verbose -Message "Executing $cmd on $vmhost"

$cmdOutput = Invoke-Expression -command $plink

#If SSH was stopped on the host before running this script, this will put it back to a stopped state
if ($sshstatus.Running -eq $False) {
    Get-VMHostService | Where-Object {$psitem.key -eq "tsm-ssh"} | Stop-VMHostService -Confirm:$False
    }

$cmdOutput
Continue Reading

VMworld 2018: Lessons Learned

VMworld 2018 came and went in a flash. Not only was it my first time attending VMworld, but it was my first time at a tech conference, as well as my first time in Las Vegas.

There were a lot of lessons learned during VMworld 2018 for me, so I’ll try to summarize my experience and advice in a few quick lists.

Do:

  • Meet new people. For a conference full of nerds, these people are remarkably social and willing to talk to complete strangers. They collectively hold an ocean of insight that will go untapped if you don’t make those connections.
  • Participate in the hackathon. You may miss out on a party, but what you’ll get in return is time working on a project in small groups with some of the sharpest minds the conference has to offer. Simply choose a team doing a project related to something of interest to you; the learning will follow.
  • Wear comfortable shoes. I was putting in a couple of miles per day, and although I was doing alright, I heard plenty of complaints of hurting feet at the end of day 1.
  • Drink lots of water. Whether you choose to imbibe at any of the parties or not, you are still likely to be much more active during the conference then you would be on a typical day. Stay hydrated.
  • Try to get the playlist that runs in the hands-on labs area, before sessions, and in the village. That playlist is amazing but I can’t find it anywhere, and my phone was having a hard time detecting what was playing.

Don’t:

  • Try to do it all. Take some time for yourself, and relax. Your brain can only take so much information at once. Pace yourself.
  • Stay in your comfort zone. I would argue that the connections I made at the conference are more valuable than the content of the sessions. Talk to the experts. Talk to other customers. Talk about problems you’re facing, recent victories, hobbies, whatever. Do the hackathon. Attend roundtables. Attending sessions is great, but if that’s all you do, you’re missing a large part of what the conference offers.
  • Attend 100 level sessions. These are largely geared towards managers or entry level administrators. If you’ve been working in vSphere for any amount of time, focus on 200 and 300 level sessions.
  • Go back to work on Friday. VMworld is incredible, but at the end of it, you’ll likely want to crash for a few days.

Takeaways:

My first VMworld experience was overwhelming, but incredible. That’s largely in part to my TAM. He put in a lot of work making sure I was getting into valuable sessions and attending events I wouldn’t have otherwise known about, or chose to participate in on my own. I credit him for helping me out of my comfort zone.  Attending VMworld has been something I’ve always wanted to do, and it did not disappoint. It has inspired a drive for improvement not only in the technical aspects of my day job, but also in my own contributions back to the community.

Cheers to moving forward.

Continue Reading

Perl Script to install MPI Libraries on Raspberry Pi

This particular script runs through the first 16 Pi’s in our super-computer cluster and installs three dependent MPI Libraries: libcr-dev, mpich2, and mpich2-doc.

#!/usr/bin/perl
 
#Creates a loop to do all the pi's in the cluster
for ($count = 2; $count <= 17; $count++) {
 
  my $host = "192.168.0.$count";
  #Installs the libcr-dev library
  system("ssh pi@$host 'sudo apt-get --yes --force-yes install libcr-dev'");
    if ( $? == -1 )
    {
      print "command failed: $!n";
    }
    else
    {
      print "command exited with value %d", $? >> 8;
    }

  #Installs the mpich2 library
  system("ssh pi@$host 'sudo apt-get --yes --force-yes install mpich2'");
    if ( $? == -1 )
    {
      print "command failed: $!n";
    }
    else
    {
      print "command exited with value %d", $? >> 8;
    }
    
  #Installs the mpich2-doc library
  system("ssh pi@$host 'sudo apt-get --yes --force-yes install mpich2-doc'");
    if ( $? == -1 )
    {
      print "command failed: $!n";
    }
    else
    {
      print "command exited with value %d", $? >> 8;
    }
}
Continue Reading

Perl Script to Modify Hostname and IP

I have taken on Perl scripting as a directed study. One of the projects going on at work is to take our 32 RaspberryPi’s and turn them into a “super computer” of sorts. We have the master and node images captured, but I have been working on a script that we can run to modify the hostnames and IP addresses of all the nodes post-imaging.

Below is my script which accepts user input for the Hostname and IP.

# This needs to be run with sudo
#
print "Please enter the new hostname: n";
$newName = ;
chomp($newName);

#Attempt to edit the hostname file
$hostFile = "/etc/hostname";

open (FILE1, ">$hostFile") or die "Can't open $hostFile: $! n"; 
print FILE1 "$newNamen";
close FILE1;

print "Hostname file has been modified! n";

#Edit the hosts file and replaces the hostname

$hostsFile = "/etc/hosts";

open(FILE, "<$hostsFile") || die "Can't open $hostsFile: $! n";
my @lines = ;
close(FILE);

my @newlines;
foreach(@lines) {
   $_ =~ s/NodePi01/$newName/g;                       
   push(@newlines,$_);
}
print "Hosts orginal contents have been modified with new Hostname... n";
open(FILE2, ">$hostsFile") || die "Can't open $! n";
print FILE2 @newlines;
close(FILE2);
print "Hosts file has been successfully modified! n";

#Does the IP configuration....
print "Please enter the new IP Address: n";
$newIP = ;
chomp($newIP);
$dhcp = "dchp";
$static = "static";
$ipFile = "/etc/network/interfaces";

open(IP, "<$ipFile") || die "Can't open $ipFile: $! n";
my @lines2 = ;
close(IP);

my @newlines2;
foreach(@lines2) {
   $_ =~ s/iface eth0 inet dhcp/iface eth0 inet $staticn address $newIPn netmask 255.255.255.0n gateway 192.168.0.1n/g;                       
   push(@newlines2,$_);
}
print "Interface file orginal contents have been modified with new settings... n";
open(FILE2, ">$ipFile") || die "Can't open $ipFile $! n";
print FILE2 @newlines2;
close(FILE2);
print "IP Address and network settings have been successfully modified! n";

#Code to reboot the node 
$reboot = '/sbin/init 6';
print "You must reboot to apply changes, do you want to reboot now? (yes/no)n";
chomp($input = );

if($input eq "yes") {
print "Now rebooting ....n";
system $reboot;
	}
else{
print "Bye !n";
}
Continue Reading

Automatic Ad-Hoc in Windows 7

This How-To will assume you have marginal experience in navigating the Windows 7 operating system. First I will cover setting up the host machine, then I will cover setting up the clients that connect to it.

Setting up the Host:

  1. Decide on a network name, security type, encryption type and the key of the ad-hoc network.
  2. Disconnect your connection to any wireless network and switch off/disable your wireless device. Turn on/enable your wireless device but don’t connect to any network.
  3. Click on the network icon in the taskbar.
  4. Click Open Network and Sharing Center > Manage Wireless Networks > Add.
  5. Click “Create an ad hoc network”.
  6. Read the information and click next.
  7. Enter the network name (SSID), security type, encryption type (if any) and the key that you decided in step 1. Make sure you check the box to “Save this network”!
  8. The ad hoc network will then be created.

Now that the host has been setup with the ad hoc network, we must configure it to broadcast that network at login in order for clients to be able to connect to it. To enable automatic connection:

  1. Launch the Task scheduler.
  2. In the task pane on the left, right click on “Task Scheduler (Local)” and click “Create Task…”
  3. Under the General tab, name the task “Automatic ad hoc”. Adjust Security options to meet your needs if necessary.
  4. Under the Triggers tab, click “New…”
  5. In the New Trigger windows select to begin the task at log on. (Important)
  6. Under the Actions tab, click “New…”
  7. The action should be Start a Program, and the program you want to run is netsh.exe (which can be browsed to).
  8. In the add arguments box, type: “wlan connect NetworkName” (Without the quotes). NetworkName must be substituted with the SSID of your ad-hoc network.
  9. Click Okay.
  10. If you are using a laptop, go to the Conditions tab and uncheck the box that says “Start the task only if the computer is on AC power” That will prevent the connection from starting if using battery power. If you aren’t using a laptop, skip this step.
  11. Click Ok to save the task.
  12. Log out and back in to see if it works.

Now you must set up the clients to connect to the host. Repeat these steps on all the machines that you will connect to the wireless ad hoc network. To connect a client to the host network:

  1. Disconnect your connection to any wireless network and switch off/disable your wireless device. Turn on/enable your wireless device but don’t connect to any network.
  2. Click on the network icon in the taskbar.
  3. Click Open Network and Sharing Center > Manage Wireless Networks > Add.
  4. Click “Manually create a network profile”.
  5. Enter the network name (SSID), security type, encryption type, and the key that you set up on the network host.
  6. Uncheck both checkboxes, “Start this connection automatically” and “Connect even if the network is not broadcasting”.
  7. Click Next > Close. Your connection must appear in the list with the icon suggesting infrastructure (two big screens connected to a tube).
  8. Launch a Command Prompt, type in “netsh wlan set profileparameter name=NetworkName ConnectionType=IBSS” without the quotes, exactly as shown. You must substitute NetworkName with the SSID (network name) of your ad-hoc network set up on the host.
  9. If everything went well, you’ll see that the icon has now changed to an ad-hoc icon (three small screens connected to each other) in the Manage Wireless Networks window.
  10. Try connecting to the ad hoc network. You will notice that you no longer need to enter the network key.
  11. Repeat the task scheduling process above exactly as described to automate the connection process.

You should now be set up with automatically connecting machines using an ad hoc network!

Continue Reading