Problems With mon_disk_space Script? (VMware KB 2058187)

I recently attempted to deploy the mon_disk_space script from VMware KB 2058187. The instructions from the KB are straightforward; users only need to modify the below two values to get started:

# Please provide email for alert messages
email='wmilliron@example.com'
# Please provide percentage threshold for PostgreSQL used disk space
thresh=10

The script should send an email to the address provided when the PostgreSQL volume is utilizing more capacity than the provided (as a percentage) threshold. For my testing, I put the initial value at 10 knowing it would trigger the email to send.

After copying the script to /etc/cron.hourly on the VCSA and running ‘chmod 700 /etc/cron.hourly/mon_disk_space‘ to ensure the script is executable by cron, emails still were still not showing up, even after waiting over an hour. The troubleshooting began…

First, make sure cron is attempting to execute the script by running:

grep cron /var/log/vmware/messages

You should find entries similar to this in the log:

run-parts[51761]: (/etc/cron.hourly) starting mon_disk_space
run-parts[51761][51796]: (/etc/cron.hourly) finished mon_disk_space

If you see those entries, then cron is able to execute the script, so the problem seems to be within the script itself. If you take a look at line 9 of the provided script, the variable ‘db_type’ is populated by running:

cat /etc/odbc.ini | grep DB_TYPE | awk -F= '{print $2}' | tr -d ' '

When I run that single command against my 6.7 VCSA, I get these duplicate values:

vcsa [ ~ ] cat /etc/odbc.ini | grep DB_TYPE | awk -F= '{print $2}' | tr -d ' '
PostgreSQL
PostgreSQL

Let’s take a look at the provided script again. Lines 10-12 are looking for a single “PostgreSQL” entry, but the VCSA is providing back two values. This condition causes the script to exit, which explains why no emails are sent.

Simply adding a ‘uniq’ to line 9 will cause the script to produce a single, unique value. Line 9 of mon_disk_space ends up looking like this:

db_type=`cat /etc/odbc.ini | grep DB_TYPE | awk -F= '{print $2}' | uniq | tr -d ' '`

After making the change, I manually triggered the cron job by running run-parts /etc/cron.hourly. The alert properly triggered, and the email showed up in my inbox. Lastly, don’t forget to go back and modify the alerting threshold on line 6 of the script to something more sensible.

Continue Reading

Introducing the vSphere Migration Toolkit

With 2018 coming to a close, I thought I would share a pet project that I’ve thrown a little time into off and on for the past few months.

A good portion of my job in the first half of 2019 will be migrating hundreds of Microsoft Windows workloads from Hyper-V to vSphere. With any change in hypervisor, there are often steps that need to be completed on the VM to ensure proper functionality. My project has been to create a powershell module to facilitate those steps with Windows workloads.

With this 1.0.0 release, the module has three usable cmdlets:

  • Get-IPInfo – Harvests all network settings (any number of NICs, any number of IPs per NIC, and even supports WINS) from a server prior to migration into a CSV file.
  • Set-IPInfo – Injects the network settings collected by Get-IPInfo into the target workload post-migration. The injection leverages VMware Tools, and no network connectivity is required on the target VM! (Shoutout to Luc Dekens for his work on Invoke-VMScriptPlus v2)
  • Convert-SCSItoParavirtual – Converts the SCSI controller of the target VM to paravirtual. Most conversion tools leave the VMs running the LSI Logic SAS controller, but the paravirtual controller is recommended for high IO workloads. (Automates the steps for the Windows boot disk in the VMware KB: https://kb.vmware.com/s/article/1010398)

The module can be reviewed and downloaded from my Github repo: https://github.com/wmilliron/vSphere-MTK

My hope is for the community to provide feedback on improvements to the existing cmdlets, and also offer up ideas on what other migration steps could be automated. If this project matures, I would like to get it added to the Powershell gallery and add support for other OS families.

Drop me a comment with an idea of how this module can be improved, and what you’d like to see added!

Continue Reading

Associating an NAA ID with Physical Drive Bay Location on HPE Servers Running ESXi 6.7

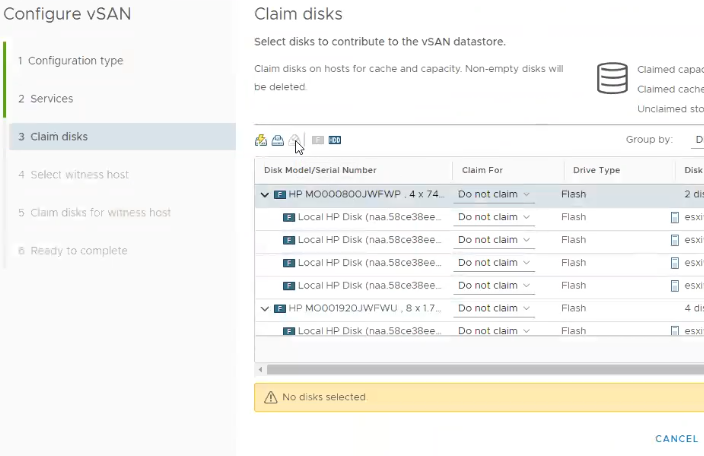
While deploying vSAN clusters on HPE servers, I came across a problem. The vSAN wizard did not display the physical bay number of the drive, so I had to figure out another way to associate the displayed NAA ID of the drive with the physical drive location. 

Disks as they appear in the vSAN configuration wizard

In my situation, I want drives in bay 1, 3, and 5 to be in disk group 1, drives in bays 2, 4, and 6 to be in disk group 2. To visualize this end goal, check out the image below.

Desired disk group layout

In order for this solution to work, it is required to have installed ESXi with the HPE ESXi image. The HPE custom image includes the Smart Storage Administrator CLI (SSACLI) utility, which is the secret sauce for identifying drive location programmatically in HPE servers. For ESXi 6.5 and forward, the following command will return physical drive information:

/opt/smartstorageadmin/ssacli/bin/ssacli ctrl slot=0 pd all show detail

The output will look something like this, with an entry for each drive.

physicaldrive 1I:1:4
Port: 1I
Box: 1
Bay: 4
Status: OK
Drive Type: Unassigned Drive
Interface Type: Solid State SAS
Size: 1.9 TB
Drive exposed to OS: True
Logical/Physical Block Size: 512/4096
Firmware Revision: HPD2
Serial Number: –
WWID: 58CE38EE2057D3C6
Model: HP MO001920JWFWU
Current Temperature (C): 29
Maximum Temperature (C): 30
Usage remaining: 100.00%
Power On Hours: 592
SSD Smart Trip Wearout: False
PHY Count: 2
PHY Transfer Rate: 12.0Gbps, Unknown
Drive Authentication Status: OK
Carrier Application Version: 11
Carrier Bootloader Version: 6
Sanitize Erase Supported: True
Sanitize Estimated Max Erase Time: 1 minute(s), 10 second(s)
Unrestricted Sanitize Supported: True
Shingled Magnetic Recording Support: None
Drive Unique ID: 58CE38EE2057D3C56193000858CE38EE

Pay attention to the highlighted WWID value. I have intentionally left off the last character. The highlighted string is the same as the NAA ID that appears in the vSphere wizard, minus the last character. We now know that the drive in this example belongs in bay 4, and is a capacity drive in disk group 2. Similar to this example, you can now use the output for the other drives to identify their physical location of each NAA value, and assign it to the proper disk group for your design.

Alternatively, you can use the serial number (removed from this example) to match up with what you can find in the iLO interface. 

However, logging into every host and running the command can be a bit tedious. Instead, I threw together a quick powershell script that leverages Plink to pull that information from specified hosts. You could easily modify the script to process multiple hosts at once or process the output however you like.
 

########## Define the below values ##########
$vmhost = "esx1"
$user = "root"
$Passwd = "password"
$PathToPlink = "C:\plink.exe"
######## DO NOT EDIT BELOW THIS LINE ########

$cmd = "/opt/smartstorageadmin/ssacli/bin/ssacli ctrl slot=0 pd all show detail"

$plink = "echo y | " + $PathToPlink + " " + "-ssh" + " " + "$user" + "@" + $vmhost + " " + "-pw" + " " + $Passwd + " " + '"' + $cmd + '"'

Connect-VIServer $vmhost -User $user -Password $Passwd
#Starts the ssh service on the host if it is not running
$sshstatus = Get-VMHostService  -VMHost $vmhost| Where-Object {$psitem.key -eq "tsm-ssh"}
if ($sshstatus.Running -eq $False) {
    Get-VMHostService | Where-Object {$psitem.key -eq "tsm-ssh"} | Start-VMHostService
    }
Write-Verbose -Message "Executing $cmd on $vmhost"

$cmdOutput = Invoke-Expression -command $plink

#If SSH was stopped on the host before running this script, this will put it back to a stopped state
if ($sshstatus.Running -eq $False) {
    Get-VMHostService | Where-Object {$psitem.key -eq "tsm-ssh"} | Stop-VMHostService -Confirm:$False
    }

$cmdOutput
Continue Reading

Perl Script to install MPI Libraries on Raspberry Pi

This particular script runs through the first 16 Pi’s in our super-computer cluster and installs three dependent MPI Libraries: libcr-dev, mpich2, and mpich2-doc.

#!/usr/bin/perl
 
#Creates a loop to do all the pi's in the cluster
for ($count = 2; $count <= 17; $count++) {
 
  my $host = "192.168.0.$count";
  #Installs the libcr-dev library
  system("ssh pi@$host 'sudo apt-get --yes --force-yes install libcr-dev'");
    if ( $? == -1 )
    {
      print "command failed: $!n";
    }
    else
    {
      print "command exited with value %d", $? >> 8;
    }

  #Installs the mpich2 library
  system("ssh pi@$host 'sudo apt-get --yes --force-yes install mpich2'");
    if ( $? == -1 )
    {
      print "command failed: $!n";
    }
    else
    {
      print "command exited with value %d", $? >> 8;
    }
    
  #Installs the mpich2-doc library
  system("ssh pi@$host 'sudo apt-get --yes --force-yes install mpich2-doc'");
    if ( $? == -1 )
    {
      print "command failed: $!n";
    }
    else
    {
      print "command exited with value %d", $? >> 8;
    }
}
Continue Reading

Perl Script to Modify Hostname and IP

I have taken on Perl scripting as a directed study. One of the projects going on at work is to take our 32 RaspberryPi’s and turn them into a “super computer” of sorts. We have the master and node images captured, but I have been working on a script that we can run to modify the hostnames and IP addresses of all the nodes post-imaging.

Below is my script which accepts user input for the Hostname and IP.

# This needs to be run with sudo
#
print "Please enter the new hostname: n";
$newName = ;
chomp($newName);

#Attempt to edit the hostname file
$hostFile = "/etc/hostname";

open (FILE1, ">$hostFile") or die "Can't open $hostFile: $! n"; 
print FILE1 "$newNamen";
close FILE1;

print "Hostname file has been modified! n";

#Edit the hosts file and replaces the hostname

$hostsFile = "/etc/hosts";

open(FILE, "<$hostsFile") || die "Can't open $hostsFile: $! n";
my @lines = ;
close(FILE);

my @newlines;
foreach(@lines) {
   $_ =~ s/NodePi01/$newName/g;                       
   push(@newlines,$_);
}
print "Hosts orginal contents have been modified with new Hostname... n";
open(FILE2, ">$hostsFile") || die "Can't open $! n";
print FILE2 @newlines;
close(FILE2);
print "Hosts file has been successfully modified! n";

#Does the IP configuration....
print "Please enter the new IP Address: n";
$newIP = ;
chomp($newIP);
$dhcp = "dchp";
$static = "static";
$ipFile = "/etc/network/interfaces";

open(IP, "<$ipFile") || die "Can't open $ipFile: $! n";
my @lines2 = ;
close(IP);

my @newlines2;
foreach(@lines2) {
   $_ =~ s/iface eth0 inet dhcp/iface eth0 inet $staticn address $newIPn netmask 255.255.255.0n gateway 192.168.0.1n/g;                       
   push(@newlines2,$_);
}
print "Interface file orginal contents have been modified with new settings... n";
open(FILE2, ">$ipFile") || die "Can't open $ipFile $! n";
print FILE2 @newlines2;
close(FILE2);
print "IP Address and network settings have been successfully modified! n";

#Code to reboot the node 
$reboot = '/sbin/init 6';
print "You must reboot to apply changes, do you want to reboot now? (yes/no)n";
chomp($input = );

if($input eq "yes") {
print "Now rebooting ....n";
system $reboot;
	}
else{
print "Bye !n";
}
Continue Reading