I ran into a situation lately where we had a disk throw a predictive failure alert on an HPE Proliant server at a remote site running VMware ESXi 6.7. Using the iLO is a great way to figure out which drive bay contains the failed drive, but it does not provide a mechanism to “blink” the UID so that the on-site technician can easily identify and replace the correct drive.
This particular server belonged to a vSAN cluster. vSAN disk management within vSphere provides the ability to be able to enable the LED on a drive, but that functionality did not work for us. In an earlier post, I found that I could use the Smart Storage Administrator CLI (SSACLI) utility that is included with the custom HPE ESXi iso in order to determine drive bay location, so I was wondering if we could use the same tool to enable the UID (blinking light) for a specific drive.
I found this guide on github which had a lot of great examples of the usage of the SSACLI utility, including the ability to enable the UID on a particular drive. First, I ran the blow command to list all of the disks in the server to confirm the bay location of the failed drive.
/opt/smartstorageadmin/ssacli/bin/ssaclictrl slot=0 pd all show detail
The output will look something like this, with an entry for each disk in the system:
physicaldrive 1I:1:4 Port: 1I Box: 1 Bay: 4 Status: OK Drive Type: Unassigned Drive Interface Type: Solid State SAS Size: 1.9 TB Drive exposed to OS: True Logical/Physical Block Size: 512/4096 Firmware Revision: HPD2 Serial Number: – WWID:58CE38EE2057D3C6 Model: HP MO001920JWFWU Current Temperature (C): 29 Maximum Temperature (C): 30 Usage remaining: 100.00% Power On Hours: 592 SSD Smart Trip Wearout: True
After identifying the failed drive, and its location of 1I:1:4, I can then tailor the command to enable the UID of that particular drive.
The above command will enable the UID for an hour, if you want to manually turn off the LED light before that, simply change the the parameter led=off.
I recently attempted to deploy the mon_disk_space script from VMware KB 2058187. The instructions from the KB are straightforward; users only need to modify the below two values to get started:
# Please provide email for alert messages
email='wmilliron@example.com'
# Please provide percentage threshold for PostgreSQL used disk space
thresh=10
The script should send an email to the address provided when the PostgreSQL volume is utilizing more capacity than the provided (as a percentage) threshold. For my testing, I put the initial value at 10 knowing it would trigger the email to send.
After copying the script to /etc/cron.hourly on the VCSA and running ‘chmod 700 /etc/cron.hourly/mon_disk_space‘ to ensure the script is executable by cron, emails still were still not showing up, even after waiting over an hour. The troubleshooting began…
First, make sure cron is attempting to execute the script by running:
grep cron /var/log/vmware/messages
You should find entries similar to this in the log:
If you see those entries, then cron is able to execute the script, so the problem seems to be within the script itself. If you take a look at line 9 of the provided script, the variable ‘db_type’ is populated by running:
Let’s take a look at the provided script again. Lines 10-12 are looking for a single “PostgreSQL” entry, but the VCSA is providing back two values. This condition causes the script to exit, which explains why no emails are sent.
Simply adding a ‘uniq’ to line 9 will cause the script to produce a single, unique value. Line 9 of mon_disk_space ends up looking like this:
After making the change, I manually triggered the cron job by running run-parts /etc/cron.hourly. The alert properly triggered, and the email showed up in my inbox. Lastly, don’t forget to go back and modify the alerting threshold on line 6 of the script to something more sensible.
Disclaimer: As an attendee of Tech Field Day 19, my flights, accommodations, and other expenses were paid for by Tech Field Day. I was not required to write about any of the content presented, and I have not been compensated in any way for this post. Some presenting companies chose to provide gifts to attendees; any such gifts do not impact my reviews or opinions as expressed on this site. All opinions in this post are my own, and do not necessarily represent that of my employer or Gestalt IT.
The Cloud Automation Services Suite is a SaaS-based offering designed for multi-cloud management and automation and is currently composed of 3 products:
Cloud Assembly serves as the blueprinting engine, allowing users to deploy workloads, such as infrastructure or containers, to any connected public or private cloud environment. Service Broker is the “storefront” of sorts. It functions as a catalog of services available to users. Tailored policies and request forms can be applied to those available services to non-disruptively maintain organizational controls such as naming, access, cost controls, etc. Code Stream is the CI/CD platform of the product. It leverages the concept of “pipelines” to automate the delivery of applications or infrastructure. Users can integrate existing tools like Gitlab and Jenkins while using Code Stream to orchestrate the flow. Cody does an absolutely excellent job of explaining and demonstrating these products in his Tech Field Day presentations, so be sure to check those out for all the juicy details.
My Thoughts
Those familiar with VMware’s current vRealize Automation product (vRA) will recognize that CAS clearly is a logical progression of the technology vRA offers. Improving the on-boarding process and developing new integrations with third-party tools and platforms are just two of the ways they’ve used customer feedback to improve the product. What remains to be seen is exactly what parallels will exist between CAS and the next version of vRA, other than the obvious difference in deployment models. Cody hints that we should pay attention to announcements at VMWorld 2019 for more information, and I intend to do just that.
What could not be ignored during the Tech Field Day presentations on CAS was just how flexible this product is. Perhaps the most concise description of that comes from Pietro Piutti:
Being able to connect to both public and private clouds and deploy workloads in just a matter of minutes provides an easy on-ramp for customers. Achieving similar functionality in recent versions of vRA is possible, but the configuration required to do so was more complicated.
That flexibility doesn’t end with the Cloud Assembly product. The entire Cloud Automation Services suite was designed with an “API-first” mentality. That allows the product to be extremely extensible. VMware isn’t asking customers to give up their tools. Do you want to continue to leverage GitHub or GitLab for your code repos? CAS supports that. Are you using Ansible or Puppet for your configuration management? No problem. While watching the demonstrations live at Tech Field Day, I couldn’t help but notice that VMware’s focus for this platform is to make it consumable, regardless of technical approach.
“We’ve taken concepts that could be very complex, and we’ve given people an on-ramp to use them.”
– Cody De Arkland, Technical Marketing Architect at VMware, on using Blueprints in VMware Cloud Assembly
Working in this field, it’s common to see a new product or platform that is impressive in function but requires users to abandon their existing tools or processes. Those processes then have to be rebuilt on the new platform with new methods. That isn’t the play by VMware with Cloud Automation Services. They understand that for this product to be adopted, it must be usable, and they must allow users, administrators, and developers to bring their own tools and processes.
The well-defined API-driven approach has allowed @VMware products to integrate seamlessly with external platforms or services.
That enables customers to integrate their existing systems without compromise.#TFD19
Keep in mind that VMware Cloud Automation Services is a SaaS offering, and that comes with the added benefit of not having to manage the infrastructure to perform these functions. But, SaaS products aren’t for everyone. Although CAS is being touted as the next evolution of vRA, I don’t see vRA being deprecated in favor of CAS. I hope that feature parity is maintained between CAS and vRA moving forward so that the customer can decide what product is right for them, without sacrifice. Cody is refreshingly transparent in his presentations and makes clear that all of a customers’ desired product integrations may not exist yet, but that they take feedback very seriously and are rapidly developing to accommodate for customers’ needs. I’m looking forward to getting an update on the future of these products at VMWorld 2019.
In a nutshell, VMware’s Cloud Automation Services platform allows organizations to embrace DevOps methodologies without attempting to funnel customers into using a particular set of tools. I’m excited to see what is added and refined in the product, as this platform only became generally available early in 2019. If you want to get your hands on the product to learn more, VMware offers a hands-on lab specific to Cloud Automation Services.
Designing vSAN clusters with a failures to tolerate (FTT) value of 2 allows increased redundancy as well as reduced risk, especially during maintenance windows. However, that increase in redundancy comes at a storage cost. In all-flash solutions, that storage cost can be somewhat offset by leveraging vSAN RAID 6 (Erasure Coding) policies. When designing clusters with an FTT=2 using RAID 6 policies, there are several aspects to consider:
What is vSAN RAID 6 Erasure Coding?
RAID 6 is a type of RAID that leverages 4 data bits with 2 parity bits. VMware vSAN uses erasure coding (a term that means to encode and partition data into fragments) to split data into the 4 data and 2 parity components. Those computations of erasure coding have a performance impact, and that is why VMware requires all flash storage in order to use RAID 6 erasure coding policies. The use of erasure coding affords a considerable capacity improvement. For example, when using RAID 1 for an FTT=2 policy, the storage multiplier is 3x – a 100GB VM will consume 300GB. With RAID 6, the storage multiplier is only 1.5x. That same 100GB VM will only consume 150GB. Check out the Virtual Block’s blog for some great info on the use of erasure coding in vSAN.
vSAN RAID 6 (Erasure Coding) Requirements
If you want to leverage RAID 6 erasure coding polices, the following requirements must be met:
vSAN Advanced license
The hosts in the cluster must use all-flash storage
The cluster must have at least 6 hosts
On-disk format version 3 or later for RAID 5/6 polices
Additional information on vSAN RAID 6 requirements can be found here.
Physical Host Layout
Before getting into vSAN configuration specifics, it is best practice to separate hosts physically. This is commonly accomplished by splitting hosts in a cluster among multiple racks. Those racks should be spread out as much as is possible. The only requirement is a sub-1ms RTT between hosts in the cluster. Given that using RAID 6 erasure coding policies have a minimum 6 host requirement, it would be ideal to split a cluster into 6 or more racks.
Use of Fault Domains
vSAN uses what is referred to as fault domains to represent the physical grouping of hosts. In many cases, one fault domain represents one rack of hosts. VMware’s documentation for managing fault domains on vSAN is very helpful, and I recommend giving it a read. However, that post indicates the formula for achieving FTT=2 with fault domains uses the formula 2*n+1 where n is the desired FTT value. Using that formula would indicate that 5 fault domains would be enough to satisfy the requirement. That formula does not hold true for RAID 6 policies. If you refer back to the the 6 components (4 data + 2 parity) used in RAID 6 policies, vSAN will distribute those components across the configured fault domains. In short, if you want to leverage fault domains with RAID 6 erasure coding policies, there must be at least 6 fault domains. If the cluster being designed has exactly 6 nodes, or an odd number of nodes, there is no drawbacks to putting only one host into a fault domain (even if other fault domains in the same cluster have more than one host). Although the use of fault domains is recommended, they are not required. RAID 6 policies will also work with no fault domains configured.
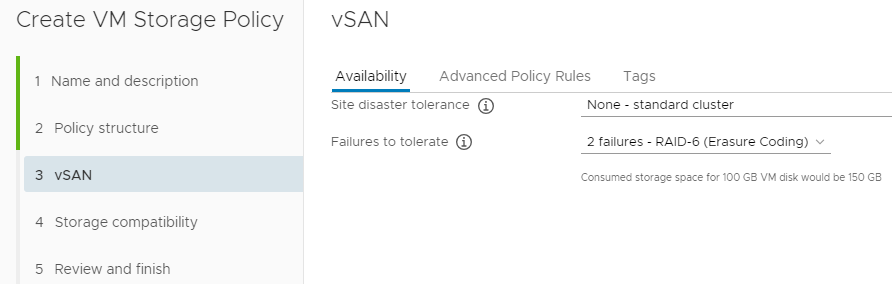
Configuring the RAID 6 Storage Policy
At this point, the only remaining piece of the “puzzle” is to set up the SPBM policy for RAID 6. Assuming everything is set up correctly, this will be the easiest part. Simply create a new Storage Policy and select “2 failures – RAID-6 (ErasureCoding)” for the failures to tolerate option under vSAN rules.
The next screen will show all of the vSAN datastores in your environment that are compatible with the RAID 6 policy. If you do not see the proper datastore in this list, change the drop down to show incompatible clusters, and hover over the incompatibility reason. If you see an error similar to “VASA provider is out of resources to satisfy this provisioning request”, or see symptoms outlined in VMware KB 2065479, verify that you have a proper fault domain count, and that they are configured properly.
With 2018 coming to a close, I thought I would share a pet project that I’ve thrown a little time into off and on for the past few months.
A good portion of my job in the first half of 2019 will be migrating hundreds of Microsoft Windows workloads from Hyper-V to vSphere. With any change in hypervisor, there are often steps that need to be completed on the VM to ensure proper functionality. My project has been to create a powershell module to facilitate those steps with Windows workloads.
With this 1.0.0 release, the module has three usable cmdlets:
Get-IPInfo – Harvests all network settings (any number of NICs, any number of IPs per NIC, and even supports WINS) from a server prior to migration into a CSV file.
Set-IPInfo – Injects the network settings collected by Get-IPInfo into the target workload post-migration. The injection leverages VMware Tools, and no network connectivity is required on the target VM! (Shoutout to Luc Dekens for his work on Invoke-VMScriptPlus v2)
Convert-SCSItoParavirtual – Converts the SCSI controller of the target VM to paravirtual. Most conversion tools leave the VMs running the LSI Logic SAS controller, but the paravirtual controller is recommended for high IO workloads. (Automates the steps for the Windows boot disk in the VMware KB: https://kb.vmware.com/s/article/1010398)
My hope is for the community to provide feedback on improvements to the existing cmdlets, and also offer up ideas on what other migration steps could be automated. If this project matures, I would like to get it added to the Powershell gallery and add support for other OS families.
Drop me a comment with an idea of how this module can be improved, and what you’d like to see added!